Activities --> Mystery Quilt 2017-2018
Update: This mystery quilt was a project in our 2017-2018 guild season. Completed quilt tops were shown at our May 2018 guild meeting - see the blog post for photos. Several completed quilts were displayed at our 2019 Quilt Show.
This information is retained here for your reference.
This information is retained here for your reference.
|
The instructions for each step of the Mystery Quilt will be available in October, December, January, March, and the final set in April when the mystery is revealed. You will have 1 or 2 months to complete each step.
Note: The original plan for this quilt was adjusted by adding a set of instructions in January. We were so inspired by the creative borders in Sherri Hisey’s quilts at our November meeting, that we have added a border to the mystery quilt, and consequently an additional set of instructions. We hope you'll bring in your completed quilt tops to the May meeting - top only, NOT a completed quilt. This quilt contains traditionally pieced blocks including a small number of paper-pieced blocks. |
Instructions
|
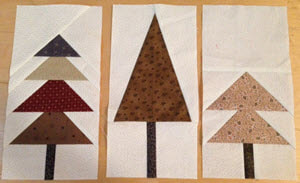
Note: The top of the first tree is not exactly as in the photograph. |
Q & A
If you have any questions about this project please contact Mary deVries or Patti Moore or contact the guild.
Your questions and answers are posted here.
Your questions and answers are posted here.
General
Question: Can I use more than 6 fabrics if I want to use fabrics from my stash but I don't have enough (3/4 - 1 yard) of a fabric?
Answer: It would be okay to use more than 6 fabrics. Choose 6 colours, and if you do not have enough of, for example, a blue print you want use, you could also use another blue print with the same value of colour.
Answer: It would be okay to use more than 6 fabrics. Choose 6 colours, and if you do not have enough of, for example, a blue print you want use, you could also use another blue print with the same value of colour.
Part 1
Question: How do I put the rows together?
Answer: You don"t. Just sew the maple leaf blocks together into 2 rows of 6 maple leaves each.
Answer: You don"t. Just sew the maple leaf blocks together into 2 rows of 6 maple leaves each.
Question: How do the 9 patches go together?
Answer: Like a checker board. Make 2 different piles of 9 patches, pile one with dark coloured centers, pile two with light coloured centers. Take a nine patch from pile one , then one from pile two, one from pile one etc. until there are 12 across. Make 2 rows of 12 nine patches.
Answer: Like a checker board. Make 2 different piles of 9 patches, pile one with dark coloured centers, pile two with light coloured centers. Take a nine patch from pile one , then one from pile two, one from pile one etc. until there are 12 across. Make 2 rows of 12 nine patches.
Our Mystery Quilt Journeys
"A mystery quilt is stepping out into the unknown!"
Newsletter editor Betty Rehbein and Janet Brownlee, responsible for guild communications have volunteered their mystery quilt journeys. Follow along and consider sending in your stories!
Newsletter editor Betty Rehbein and Janet Brownlee, responsible for guild communications have volunteered their mystery quilt journeys. Follow along and consider sending in your stories!
November 2017
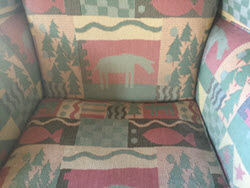 Wingback chair
I was very excited when I heard that we have the opportunity to make a mystery quilt this year. I thoroughly enjoyed the last one, The Gordian Knot, a few years ago, and seeing mystery quilts at a quilt show in Cornwall last spring.
My excitement grew when I saw the first set of instructions since I tend to favour traditional blocks in fall colours in fall themed quilts. When I calculated the likely width of the quilt (based on the length of the rows), I decided it would make a lovely throw for our living room sofa during the fall. So I searched my stash for fabric that would go with our brown leather sofa and the rest of the furniture and wall colours. I didn’t have enough fabric in the quantities needed so I fired off an email message to Mary to see if we have to stick with just 6 fabrics.
In the meantime I headed off to purchase the background fabric and additional coloured fabrics. I’m not very good at choosing complimentary colours which often leads me to buy from fabric collections. But that wasn’t going to work this time. Fortunately I got excellent help in making my selections from a very patient, knowledgeable and experienced quilter sales assistant. I had brought along an arm cover from a multi-coloured wingback chair that inspired our living room paint colours and other furnishings. In the process I learned from her that it would be ideal to have 3 medium toned accent fabrics and 3 dark toned. We auditioned many fabrics, and I learned what to look for when matching colours to the shades in the wingback chair, colour depth, and about balancing colours and pattern sizes against each other. And I also quickly discovered that none of my stash fabrics coordinated properly with the wingback chair colours and the other new fabrics that we were looking at!
I came home with 6 new fall coloured fabrics that I really like and a coordinating background shade in a linen type fabric. And my stash fabrics went back into my stash!
When I got the answer back from Mary I decided that other people might have this same question, and that other people might have their own questions. So I started a Q & A (Question and Answer) section on this Mystery Quilt page. It’s now up to 3 Q & A’s. Because I’m finishing up another quilt I haven’t yet started my mystery quilt but I expect to start it very soon. I can’t wait to see how the maple leaves and checkerboard blocks look in my lovely new fabrics. I definitely plan to have them completed by mid December.
-- Janet Brownlee
My start on this mystery quilt has been very different from Janet's. My mission this year has been to use up all the wonderful scraps I have collected, and have not had the fortitude to throw out. So of course, the first task, which has been looming in my mind for months, was to sort the scraps roughly into colour groups, and I finally did it! The way I got it done was realizing perfection would not happen, and that it would be OK to have some fabric bits wander into groups that a colour purist would not allow. The neutral background did daunt me however, so I treated myself to 3 metres of new fabric for this. Hopefully this will last for the quilt. I am now ready to begin cutting!
-- Betty Rehbein
-- Betty Rehbein
December 2017
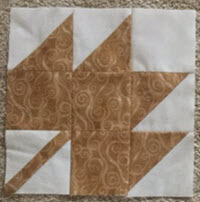
For once my quilting plan worked out. I’ve completed my leaf and checkerboard blocks well before the December meeting and I’m delighted with them. I decided to do the checkerboard blocks first because I thought they’d be quicker than the leaf blocks and I wanted to see some completed blocks quickly. Because I’m using new fabric, I was able to strip piece them and that definitely sped up the process. And the leaf blocks came together easily too. I like the nifty way of making the stems but for some reason my stems all appear to be slightly different widths. That’s one thing I really like about quilting – perfection is not required nor expected, and quirkiness can be celebrated. I decided to wait and join the blocks into strips a little later so I can decide their placement when I’m seeing a little more of the quilt. I have laid them out in a tentative order, and taken a photo. And I’m thrilled with how my fabrics look. I’m eagerly looking forward to seeing the next set of instructions but I likely won’t tackle them until after Christmas.
-- Janet Brownlee
-- Janet Brownlee
I learned something new! Maple leaf blocks look best if each leaf is the same colour. I think you have to have a really good colour sense to make one leaf from many fabrics. So it was back to the drawing board - I have selected different fabrics (in 6 color groups) to make up the leaf rows. The 9-patch rows are each going to be of the same fabric too. I'll have to work quickly to get caught up for the December instructions!
-- Betty Rehbein
-- Betty Rehbein
January 2018
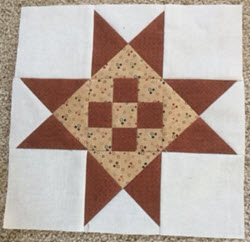
I really like star blocks so I was delighted to hear at the December Christmas party meeting that we’d be making some for the mystery quilt. My excitement was short-lived when I next heard that we’d be paper piecing the tree blocks. I’ve never learned or done paper piecing and have not really been keen but I need and want to do it now. No way out! Fortunately Mary deVries is offering to teach paper piecing at the January Sew Day for the 2019 quilt show raffle quilt, and also at her February workshop. Perfect opportunity for me to learn so I signed right up for the sew day. I tackled the star blocks as my first project in the new year after a fairly long break from quilting over the busy Christmas period. I enjoyed choosing the colour combinations for these blocks. Since I had plenty of fabric I strip pieced the little centre 9 patches. I liked that the hourglass squares were generously sized and consequently very easy to square up. While these blocks took quite a while I enjoyed piecing them and seeing my colour combinations come to life. Like the earlier blocks I did not join the star blocks together. I’ll wait and lay out all of the blocks before I decide on their placement.
-- Janet Brownlee
-- Janet Brownlee
February 2018
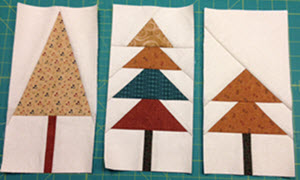
After a bit of a break from the mystery quilt to make a baby quilt for our new granddaughter Sarah, and some work on the auction quilt in support of the Arnprior & District Memorial Hospital, I'm excited to be back to the mystery quilt.
First off - the paper pieced tree blocks. Armed with my new knowledge of paper piecing so patiently and generously provided by Mary deVries at the guild Sew Day in January, I tackled them with enthusiasm and confidence. And despite some little setbacks and redos here they are! I'm very pleased with them and I quite enjoy paper piecing.
First off - the paper pieced tree blocks. Armed with my new knowledge of paper piecing so patiently and generously provided by Mary deVries at the guild Sew Day in January, I tackled them with enthusiasm and confidence. And despite some little setbacks and redos here they are! I'm very pleased with them and I quite enjoy paper piecing.
-- Janet Brownlee
March 2018

I completed my February update highly confident that my fence would be quickly completed. That was not quite to be. I didn't pay close enough attention and I stitched all of the fence and post pairs upside down! So I ripped them all apart and redid them the right way up. It actually didn't take that long for the redo. Then I did quickly finish the fence and I'm very pleased with it.
I wasn't sure if I'd admit to this but I decided to in case my experience could prevent others from doing the same thing.
The fence instructions were very well written and the illustration was perfect.
-- Janet Brownlee
I wasn't sure if I'd admit to this but I decided to in case my experience could prevent others from doing the same thing.
The fence instructions were very well written and the illustration was perfect.
-- Janet Brownlee
April 2018
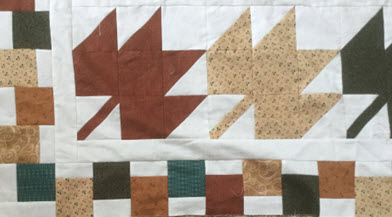
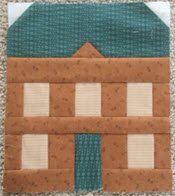
With the fourth and final set of instructions in hand I eagerly jumped in to the final steps to complete my mystery quilt top. As I've mentioned before, with the exception of the house and tree row, I had not assembled my other blocks into rows. This afforded me the opportunity to optimally place those blocks relative to the house and tree row. So I laid out my blocks on my "design floor", working upwards and then downwards from the house and tree row, ensuring that the six colours were balanced and evenly spaced. And it was wow!
Joining the rows was not without some pain. I was surprised to see that my house and tree row was wider than all of the other rows. It didn't take me long to discover that the sashing pieces were all 1" finished when they should have been cut 1" and then finished at 1/2 inch. I have no idea how that happened but it didn't take long to adjust them. And as I had suspected earlier, the grass piece above the fence had somehow stretched when I attached it. You can see this quite plainly in the photo above! So out came my trusty and well used seam ripper yet again, and this time I first attached the grass piece to the house row, and then to the fence for a much better result.
I strip pieced the blocks for the pieced border, and I then had a lot of fun determining their placement. The tips in the instructions were very helpful. I chose to use 2 fabrics for the joining pieces, and one of the other fabrics for all 4 cornerstone blocks.
The blocks are stunning when joined together, and I'm very pleased with the effect of the pieced border. So my quilt top is done, and surprisingly, well in advance of the May meeting target. I've thoroughly enjoyed this project.
I'm very much looking forward to seeing all of your mystery quilts in May, and to sharing my finished top with you. We'll then have plenty of time to complete these quilts in time for our 2019 quilt show for what I think will be a very interesting display for visitors to our show.
I also want to thank Patti and Mary for all of their creative and hard work in designing and producing the excellent instructions for this project. Well done and very much appreciated. Thank you!
-- Janet Brownlee
